
Oreo Cookies & Cream Ice Cream Recipe
This post is currently only available to Patreon supporters
2. Calculate the fat content of the milk and cream that you will be using
This process really isn’t as intimidating as it looks, just bear with me.
2.1 Which milk and cream can I use?
If you’re in North America, you can use whipping cream or light whipping cream, or heavy cream or heavy whipping cream - you can’t use half and half or light cream as those won’t contribute enough fat. If you’re in Europe, you can use whipping cream or double cream, single cream won’t contribute enough fat.
You can use fat-free (skimmed milk in Europe), reduced fat (semi-skimmed in Europe), or whole (full fat in Europe).
2.2 Calculate the fat content of your cream
The first step is to calculate the fat content, which we will express as a percentage of its weight in grams. To do this, first locate the Nutrition Facts on the side or back of your carton. For this example, we will use Horizon Organic Heavy Whipping Cream for this tutorial - its Nutrition Facts are displayed in the picture below.
4. Recipe
1. Recipe instructions
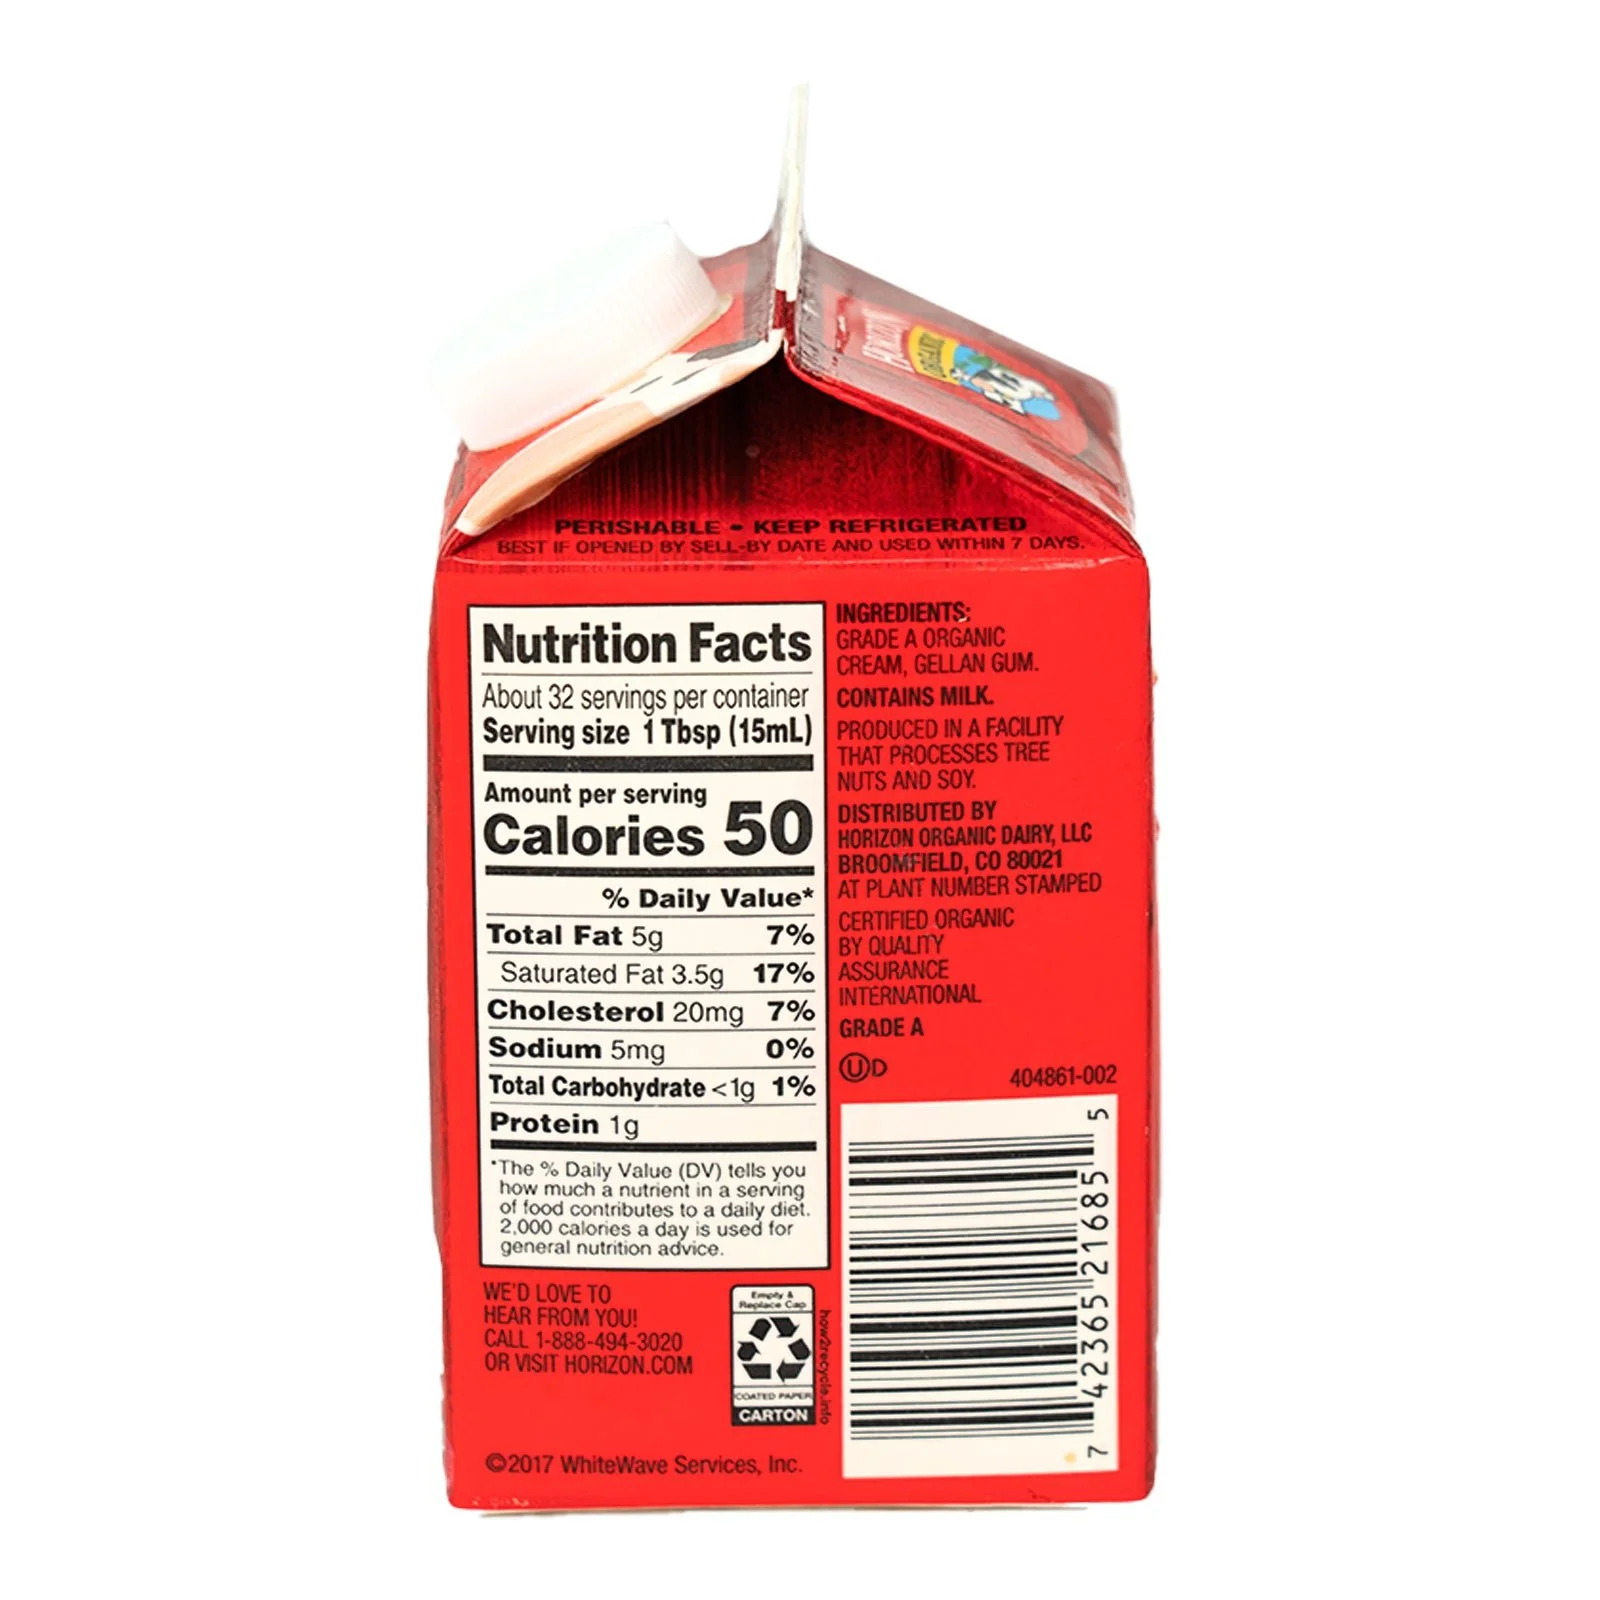
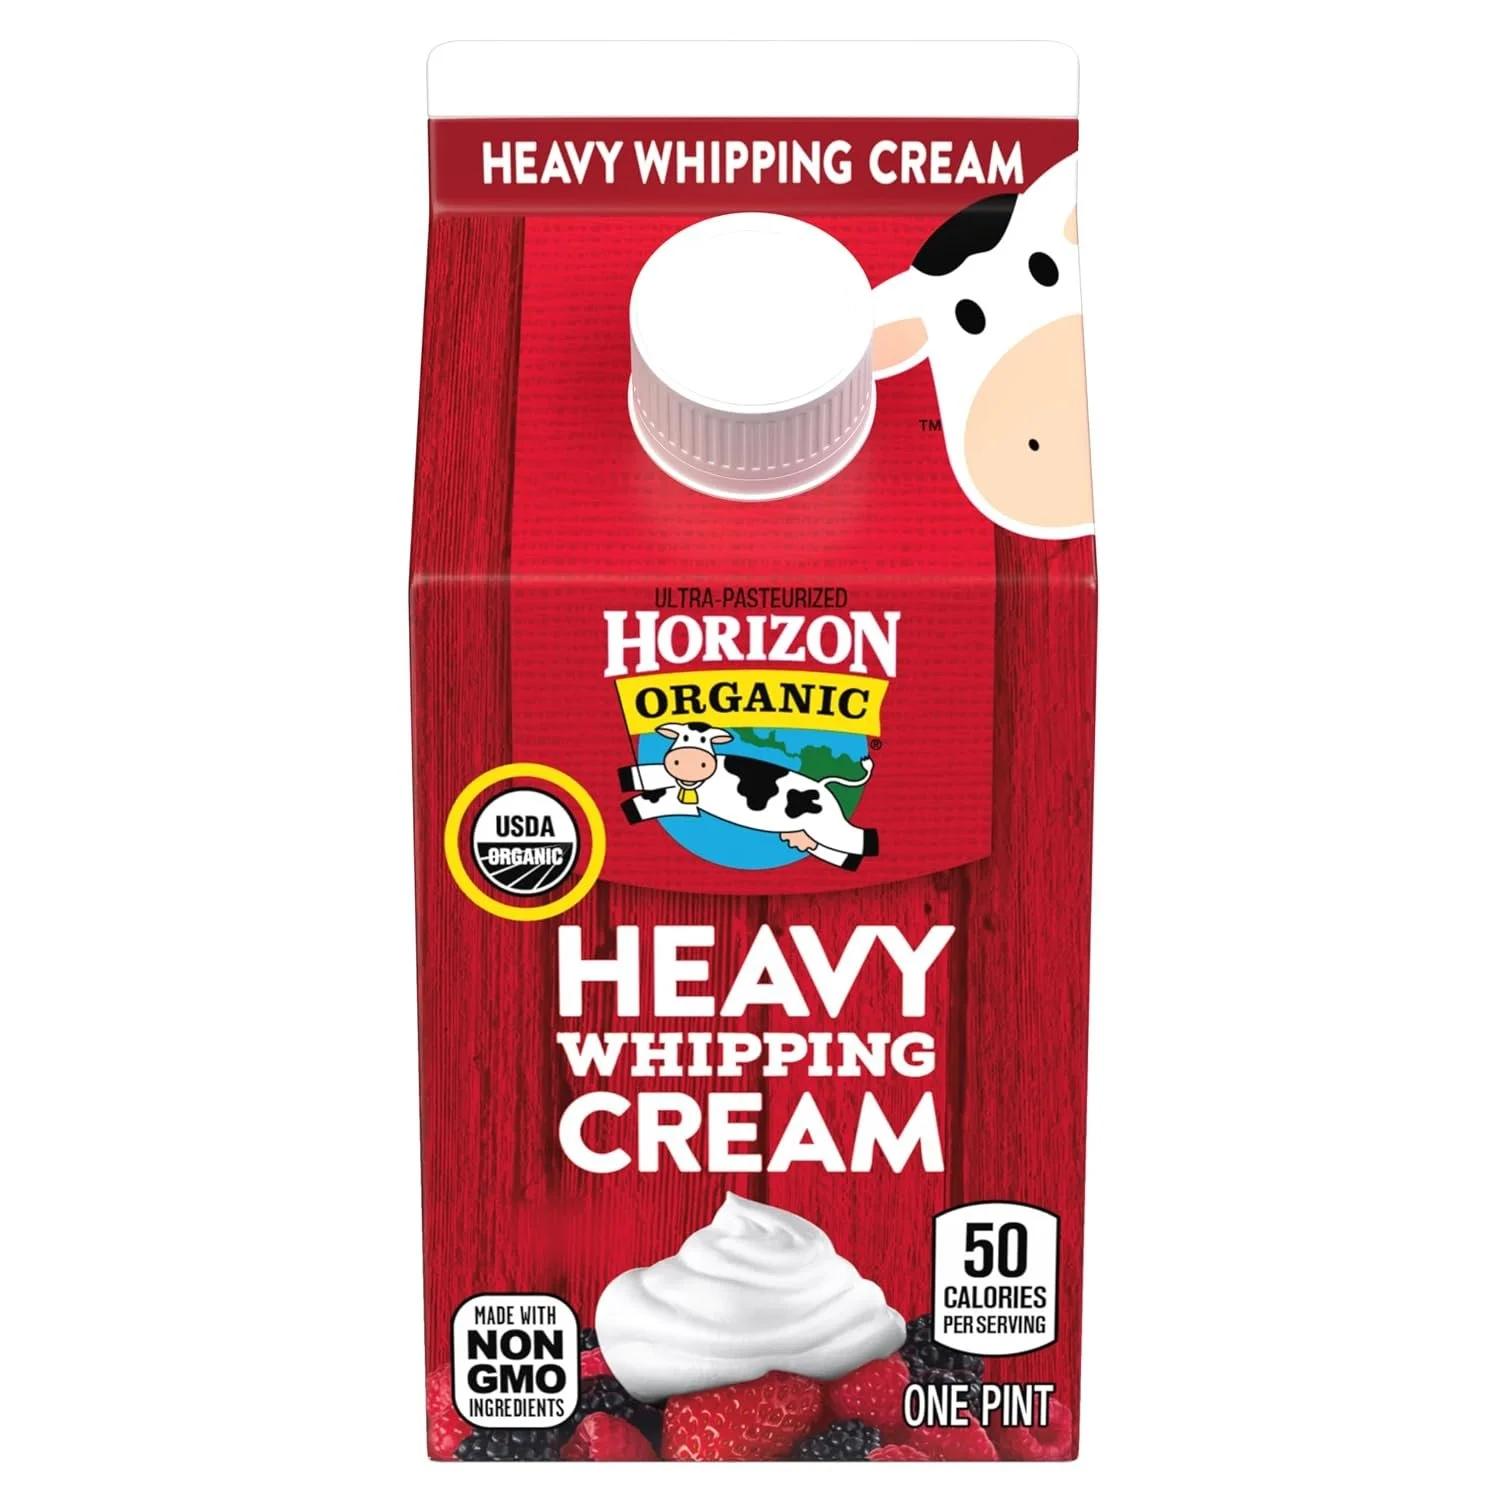
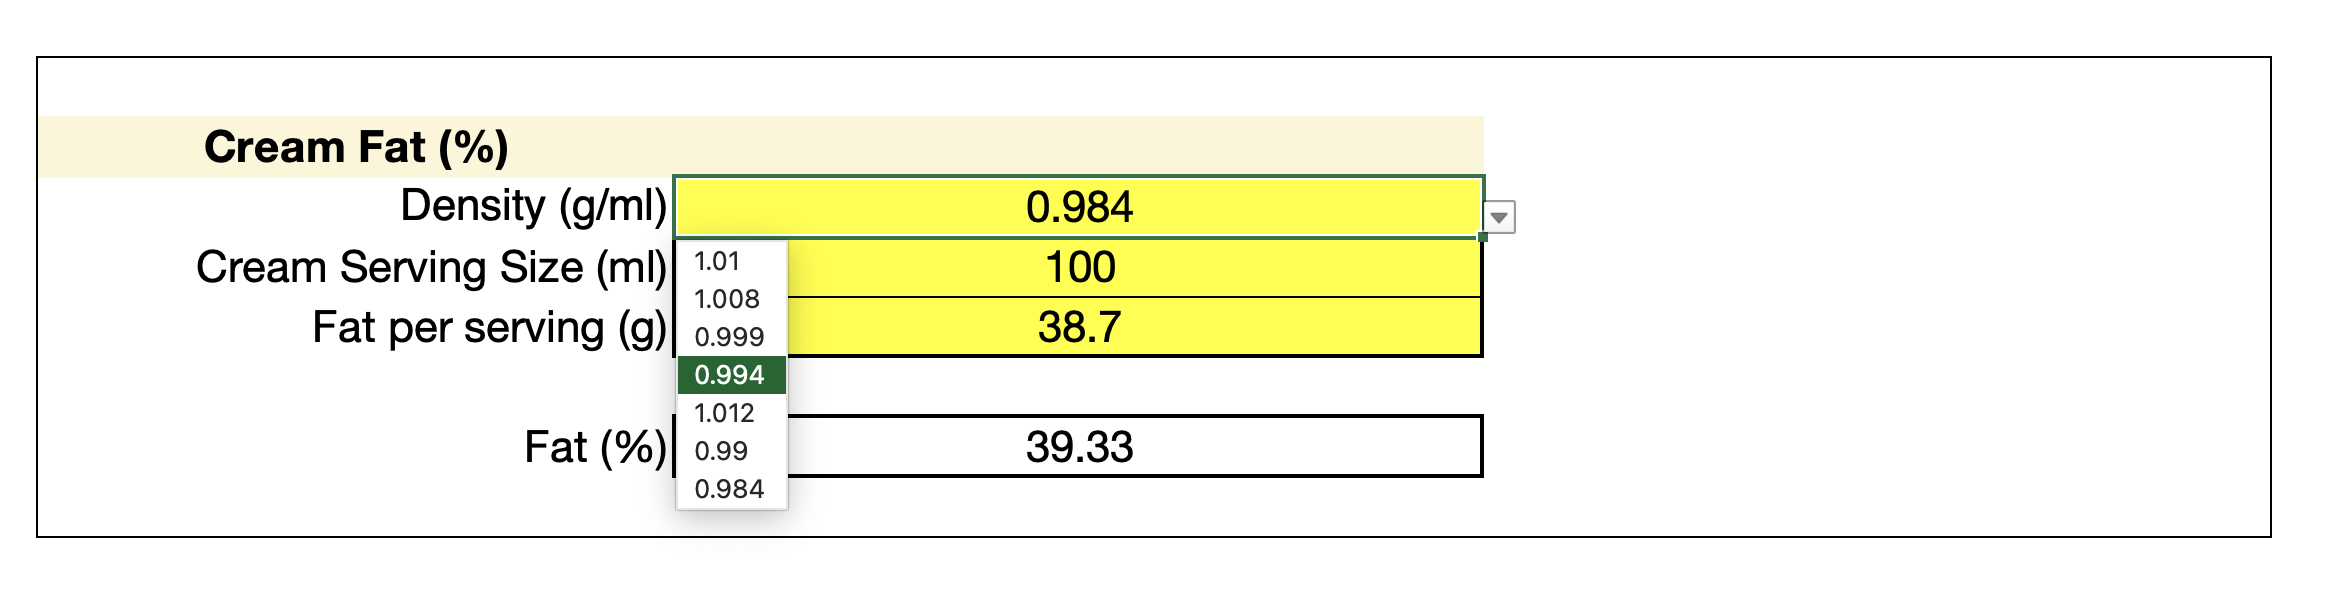
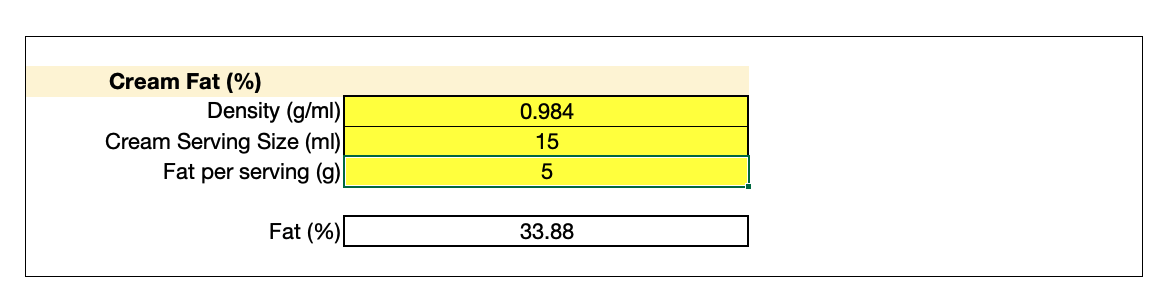
We now need to convert the Serving size in the Nutrition Facts from millilitre to grams. To do this, we need to know the density of the cream, which varies depending on, amongst other factors, its fat content. For our North American Horizon Organic Heavy Whipping Cream, Table 1 - Dairy of the spreadsheet below tells us that Heavy Whipping Cream, which can also be called ‘Heavy Cream’, must have a fat content of not less than 36% and has a density of roughly 0.994 grams per millilitre (g/ml). In the box labelled Cream Fat (%) on the right of the spreadsheet, click on the yellow cell labelled Density (g/ml) and select the drop down menu arrow. Select 0.994 from the options. Don’t be deterred by the menacing looking spreadsheet, it is very simple to use.
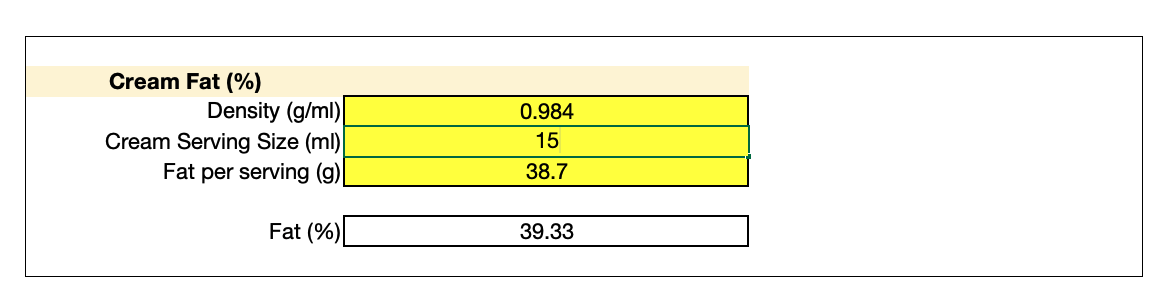
Lastly, in the yellow cell labelled Fat per serving (g), we will enter 5 because the Nutrition facts of our horizon Organic Heavy Whipping Cream tells us that the Total fat is 5g. When you then hit Enter on your keyboard, the spreadsheet will update the Fat (%) to 33.88 and we are done.
Next, in the yellow cell labelled Cream Serving Size (ml), we will enter 15 as the Serving size in the Nutrition Facts of our Horizon Organic Heavy Whipping Cream is 15ml.
3. Calculate that fat content of your milk
Next, we will calculate the fat content, which we will express as a percentage of its weight in grams, of the milk that you will be using. As mentioned above, you can use milk of any fat content.
In this example, we will be using Organic Valley grassmilk Whole Milk; its Nutrition Facts are shown in the picture below.
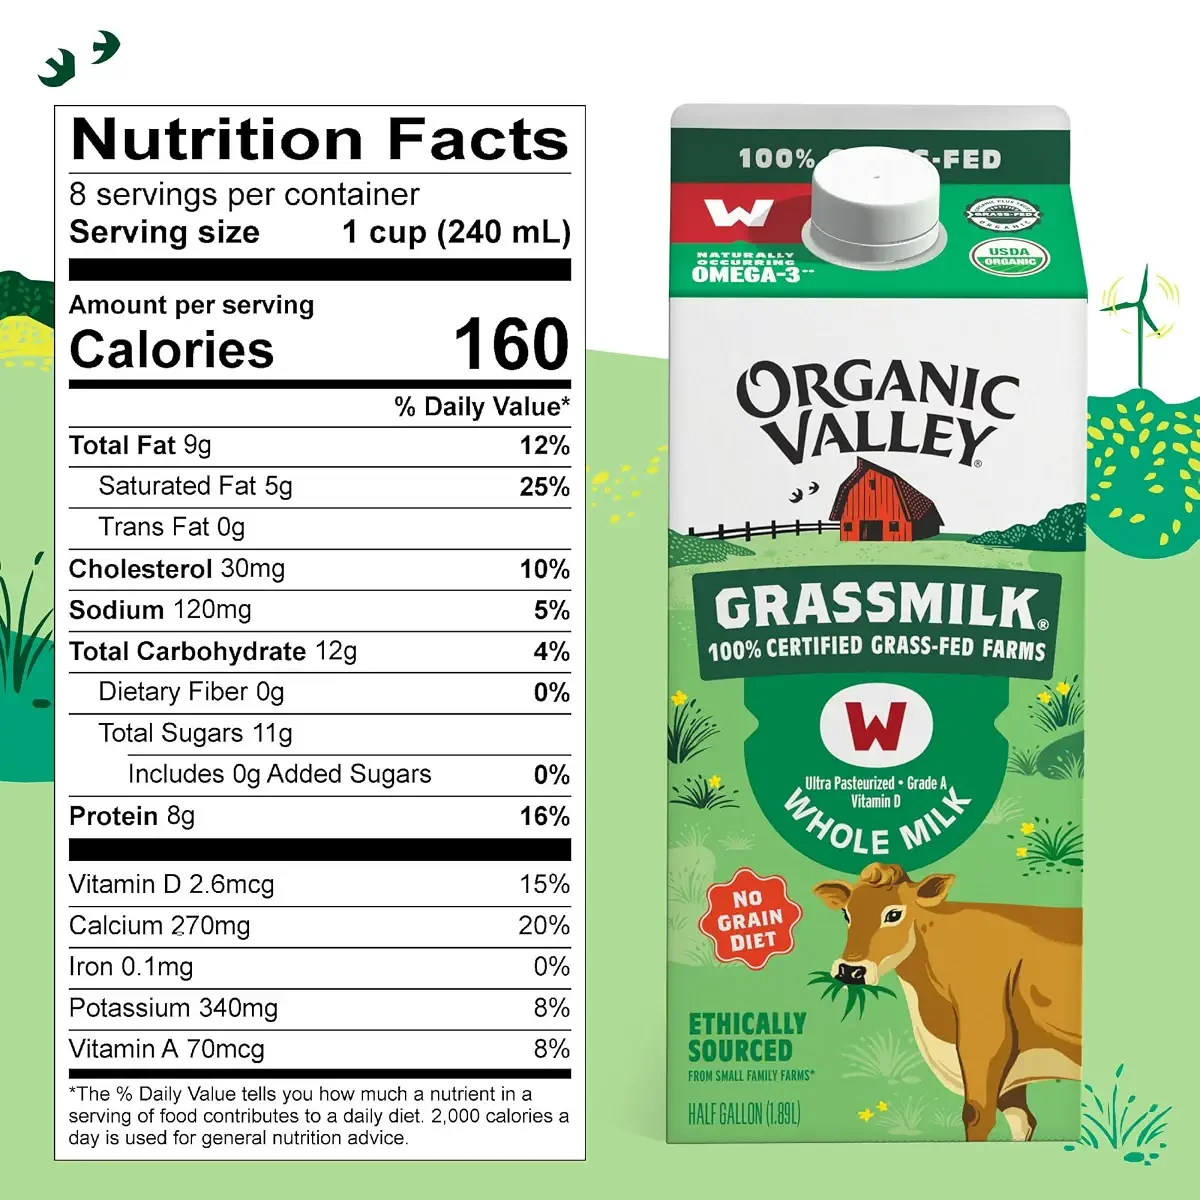
To start, enter 240 in the yellow cell labelled Milk Serving Size (ml) as per the 240ml serving size in the Nutrition Facts above.

Next, enter 9 in the yellow cell labelled Fat per serving (g) as per the 9g of Total Fat in the Nutrition Facts of our Organic Valley Whole Milk. When you hit ENTER on your keyboard, the spreadsheet will update the Fat (%) of your milk to 3.64.

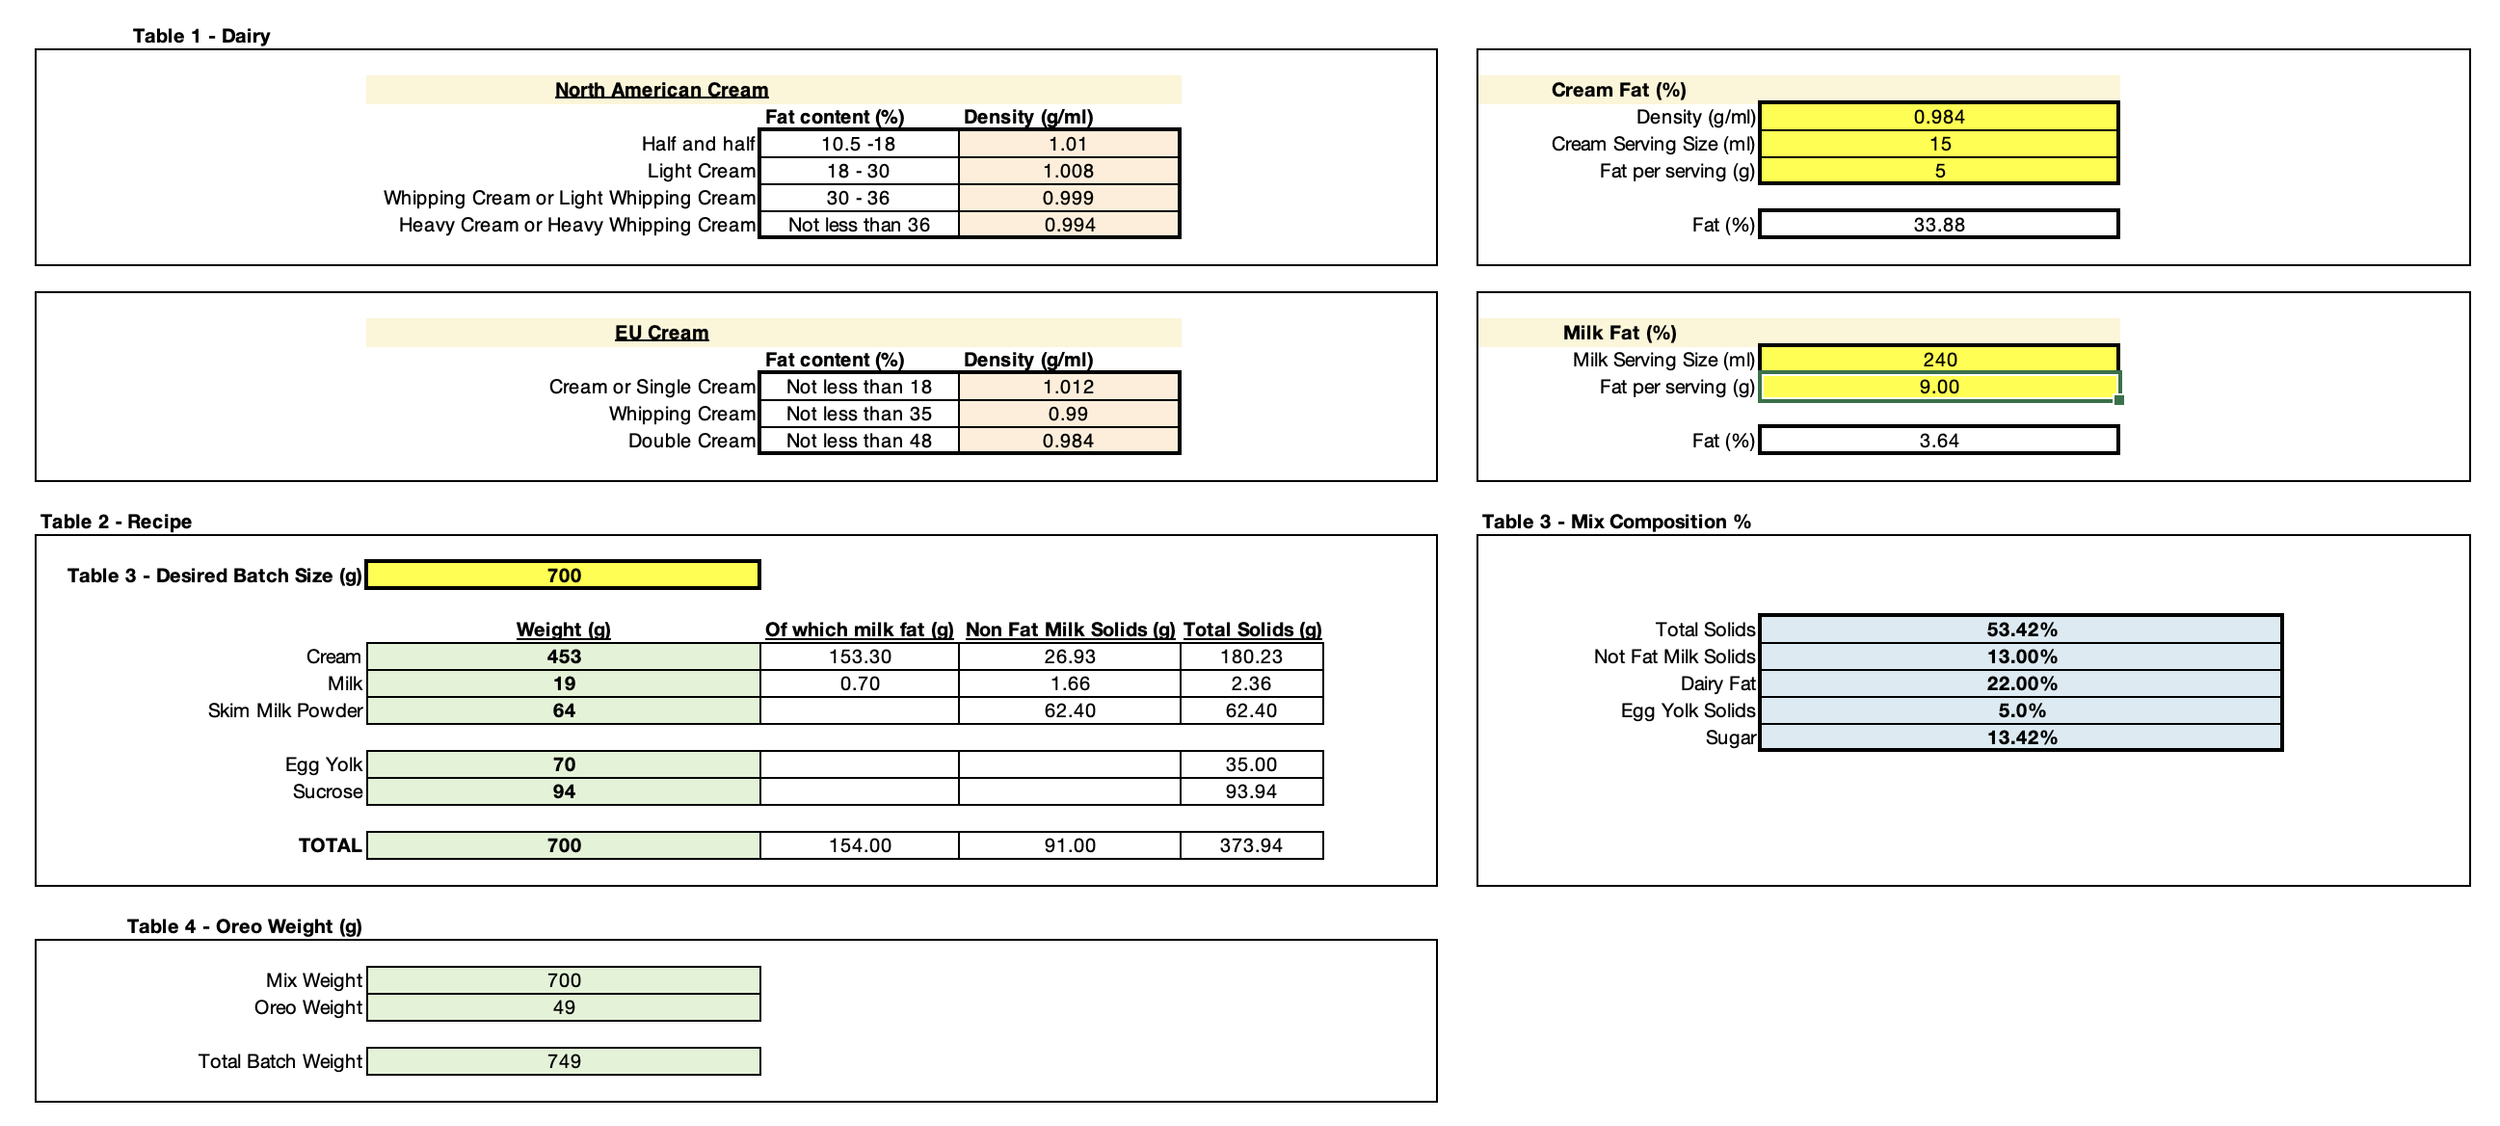
The spreadsheet at the top of this page is now ready to rock and shows the weight, in grams, of each ingredient in the cells coloured in green in Table 2 - Recipe using your Organic Valley Heavy Whipping Cream and your Organic Valley Grassmilk Whole Milk.
The default batch size of this recipe is set at 200g (I don’t know why I set this is low and it’s too cumbersome to change now) but you can change this to whatever batch size you want. In my Lello 4080 machine, I usually pasteurise and churn 700g batches.
If we increase the batch size from 200g to 700g, the weight of each ingredient, in grams, is shown in the cells coloured in green in the picture below. When you come to churn the recipe, you will add 49g of Oreos to your machine just before the 700g of mix has finished churning.
Before you begin and ideally the night before, add 100g of salt to 400ml of water and stir well. Pour this salt mixture into an ice cube tray and freeze overnight. Adding the salt to make ice cubes will bring down the freezing point of the water to roughly -18°C (-0.4 °F), which will cool down our warm mix down significantly quicker after heating compared to regular ice cubes. For commercial ice cream production here in the UK, the Dairy Products (Hygiene) Regulations 1995, Schedule 6, part v 1 (a) mandates that after pasteurisation (heating), the warm mix must be cooled to 7.2°C (45°F) or lower in under 90 minutes. I’ve found that using standard ice cubes to cool a mix at home after heating doesn’t bring down the temperature in time.
The next step is to calculate the fat content of the milk and cream that you will be using so that the spreadsheet above gives you the correct amount of each to use. Scroll down to section 2. Calculate the fat content of the milk and cream that you will be using for instructions on how to do this.
I recommend using a small pan as this will make regulating the heat easier - I use an 18cm (7 inch) deep Le Creuset saucepan when I make small batches at home.
Add the egg yolk to your pan followed by the sugar andcombint the two - the sugar will help prevent the yolks from clumping during heating.
Add the cream, milk, and skim milk powder to your pan.
Weigh the pan with all of the ingredients inside and write this number down. After heating, you will add some water back into the pan to replace the water evaporated and bring the weight of the pan plus ingredients back up to what you write down now.
Place the 500g or so salted ice cubes in a large bowl and a medium sized zip lock freezer bag next to the bowl. After heating, you will pour the hot mix into this zip lock bag, close it, and place it in your bowl of salted ice cubes to cool.
If you’re using a heavy bottom stainless steel saucepan like my Le Creuset, you can heat the mix over a medium-to-high heat whilst constantly stirring with a wooden spoon or spatula. I have an induction hob at home with a 0 to 14 heating range and heat on level 9. If you’re not using a heavy bottom pan, I recommend heating at a more cautious medium heat to prevent any burning at the bottom of the pan. Hold a digital probe thermometer in the mix with your other hand and bring the temperature up to 72°C (162°F) - it takes me about 11 minutes to bring a 700g batch up to 72°C (162°F) on my induction hob.
Once the temperature reaches 72°C (162°F), turn the heat down to low and continue heating and stirring until the temperature reaches 73°C (164°F). Once the temperature reaches 73°C (164°F), keep it at or slightly above 73°C (164°F) for 10 minutes whilst constantly stirring to pasteurise the mix. Try not to take the temperature too far higher than 73°C (164°F) as the higher the temperature gets, the more of a cooked milk flavour profile you will develop. I kep the heat on my induction cooker between levels 3 and 4 and the temperature between 73°C (164°F) and 73.8°C (165°F).
After 10 minutes at or slightly above 73°C (164°F), take the pan off the heat and weigh it. You will have evaporated some of the water during pasteurisation so add enough water back in to bring the weight back up to what it was in step 5 above. If you don’t add water back in, the solids will be more concentrated than they should, which will mean that the sugar content, fat content, not fat milk solids content, egg yolk content, and total solids content will be higher than they should be, which will likely give you a recipe that will be a bit too sweet and possibly too thick and rich. My pan and ingredients weighed 1,793g before heating and 1,752g after heating. I added 41g of water back into the pan after heating.
Once you’ve added enough water back into the pan to bring the weight back up to what it was in step 5 above, ideally blend the mix for 20 seconds or so using a stick blender to dissolve any undissolved skim milk powder. If you don’t have a stick blender, a quick stir with your spoon is fine but you will likely get a few clumps of undissolved skim milk powder when you sieve the mix - this isn’t the end of the world and is what happened to me and I still got great ice cream. Carefully sieve the mix into your ziplock bag, close it, and place it over the salted ice cubes in your bowl.
You need to get the temperature of the mix down to below 7.2°C (45°F) in under 90 minutes. I actually still need to run a test to confirm that this is indeed possible for a 700g batch using salted ice cubes and will update this step once II’ve run the test. The point of quickly cooling the mix to below 7.2°C (45°F) in under 90 minutes is to reduce bacterial growth - like milk, the longer you leave it out in a warm room, the quicker it will spoil.
Once the mix has cooled to below 7.2°C (45°F), place the zip lock bag in your fridge and leave it there overnight.
The next day, churn your mix in your ice cream machine. Just before it’s done, add the Oreo Weight in the Table 4 - Oreo Weight (g) in the spreadsheet above to the ice cream and continue churning for another minute or so. I churned 700g of mix so I added 49g of whole Oreos.
Extract your ice cream as quickly as possible into a container and place in the freezer to harden.